Showing posts with label scanning. Show all posts

ANTI FORENSICS ~ Tool


DIGITAL ANTI FORENSICS


Digital Anti Forensics

Install truecrypt

This script is used to install Truecrypt, software that is used to create encrypted files using various encryption ciphers. It contains features such as hidden partitions inside the encyption file, as well as the ability to use files and text passwords as keys to the encryption file.

Download here


Digital Forensics

hexedit

hexedit is a program that gives the user the ability to view a file in hexadecimal and ASCII view. It offers the ability to read a device as a file. It includes build in key shortcuts to make it fast and easy to edit and analyze file, including skipping to specific memory locations, cutting and pasting, changing views, modes, and syntaxes similar to that of emacs.

Example usage: hexedit [filename]

Download here
Read more

Website Vulnerability Scanning Using BackTrack


Scan Website For Vulnerabilities Using BackTrack - Uniscan
Hello CHC members we gonna scan for vulnerabilities in a website, or all the websites in the server.
In this tutorial I will use a program in BackTrack called UniScan. it's very easy to use, but very good in scanning.
First of all, open your terminal and type this command: cd /pentest/web/uniscan && ./uniscan.pl

Something like this will be printed on your terminal. Now all we have to do is follow the instructions. First of all we need a target to scan, I've chose one already and I will use it in my pictures. To start the scan, first you have to check the options which you want to use in your scan.

# HOW TO USE OPTIONS: Check the letter beside your option, and include it after the URL like this: 
./uniscan.pl -u http://www.website.com/ -b -q -d -w or put them all together. 
./uniscan.pl -u http://www.website.com/ -bqdw .This will start your scan with all the different options you included.
NOTE:- NEVER FORGET THE FORWARD SLASH AT THE END OF THE LINK IN THE END!!


Now the scan will start, and the terminal will look something like this:


This scan will scan for vulnerabilities like SQL-i / LFI / RFI and so on. It also searches for Webshells, backdoors, PHP info disclosure, Emails, and much more.

Here are some examples:
PHP.info() disclosure:


External Links/Hosts:


Source Code disclosure:


Dynamic Scan, Vulnerability Identification:
This program can also get all the sites in a server, and then you will be able to scan all of them. To do that, run this command:
./uniscan.pl -i "ip:127.0.0.1"

Change 127.0.0.1 to your target server. All the websites will be stored in "sites.txt" in the same directory.
Now to scan those sites in the list, run this command:
./uniscan.pl -f sites.txt -bqwd
You can change the options to whatever you want.

Read more

NetBIOS Scanning


Scanning NetBIOS using nbtscan and Metasploit

Hello CHC members ,During a penetration testing engagement we might come across with the NetBIOS service.In the past the NetBIOS protocol was enabled in almost every network that was running Windows.In nowadays system administrators are disabling this service due to the fact that plenty of information can be unveiled regarding shares,users and domain controllers.However NetBIOS can still be found on default configurations of Windows Server 2008 and Windows Vista so in a penetration testing this protocol can be abused if we discover it.
Generally the NetBIOS provides the following three services:
  • Name Service: UDP/137
  • Datagram Service: UDP/138
  • Session Service: TCP/139
In systems that have this service enabled we can use some tools in order to discover information about the hostnames and domains especially in windows networks.In some cases this protocol can be found and in Linux systems.
The two basic tools are nbtstat and nbtscan.The nbtstat is a command line utility that is integrated in windows systems and it can unveil information about the netbios names and the remote machine name table or local but only for one host.From the other hand the nbtscan is a netbios nameserver scanner which has the same functions as nbtstat but it operates on a range of addresses instead of one.
The next image is showing the usage of the nbtstat:
   nbtstat usage
The numeric values are called suffixes.For example the <01> and <1D> suffixes indicates the Master Browser,the <20> that the machine is running File Server service,the <03> that a messenger service is running and the <00> means that a workstation service is running as well.The <1E> is the Browser Service Elections.
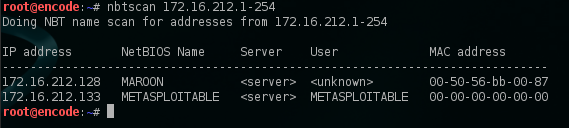
The nbtscan is by default installed on backtrack but there is a version as well for windows platforms.We can use the nbtscan in order to scan the whole network.As we can see from the next image we have discovered the IP addresses,the NetBIOS names,the users that are logged in and the MAC addresses from the hosts that are running the NetBIOS service on the network.
   nbtscan

We can use also the -v option in order to produce a verbose output.
  nbtscan – verbose output

With the verbose option the output format is similar to the nbtstat.Again the <01> indicates the Master Browser service,the <00> the workstation,the <20> the File Server service and the <1e> and <1d> the Browser Service Elections and the Master Browser.Also we can see that the domain that this workstation belongs is London.
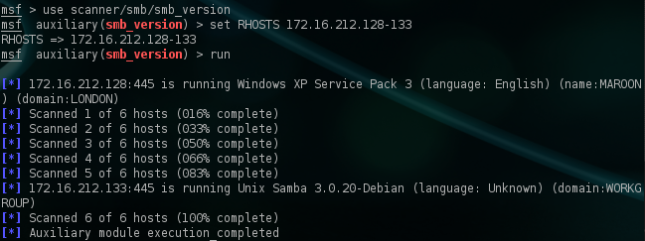
As an alternative option we can use the metasploit module smb_version which will unveil additional information like the operating system name and version,the service pack level,the language,the system and domain name.
Metasploit smb_version module

Conclusion
As we saw in this article from systems that had enabled the netbios service we have managed to discover plenty of information including the domain names,users,operating systems versions,MAC addresses and other.This service if found enabled can be used in the information gathering stage of a penetration test.So from the security point of view it is recommended this service to be disabled.
Read more

ACUNETIX WEB VULNERABILITY SCANNER V8


ACUNETIX WEB VULNERABILITY SCANNER 8 BETA 


Acunetix Web Vulnerability Scanner 8 BETA Released for download

Download here


Click Here to download patch for Acunetix Web Vulnerability


Read more

Acunetix Vulnerability Scanner v8 Patch


Acunetix Vulnerability Scanner v8 Patch By Ghost 


Enjoy it with the amazing toool,,,,


 Download here


Click Here to Download Acunetix Vulnerability Scanner v8 Beta
Read more

BLUETOOTH HACKING - BACKTRACK


BLUETOOTH ANALYSIS IN BACKTRACK


Bluediving

Bluediving is a software suite specializing in Bluetooth penetration testing. Bluediving itself comprises of several tools, such as Bluebug and BlueSnarf. Using these tools, Bluediving is able to provide a single platform for launching nearly every type of Bluetooth based attacks. Bluediving presents a simple, easy to use command line where the user is given the option of choosing attack targets, choosing attack methods, and ever enumerating various Bluetooth devices discovered. The top level menu looks like this:


[MAIN MENU] menu: [a] Action [e] Exploit [i] Info [t] Tools

[1] Scan
[2] Scan and attack
[3] Scan and info
[4] Scan for...
[5] Add known device
[6] Change preferences
[7] Show preferences
[8] Show logfile
-=-=-=-=-=-=-=-=-=--=-=-=-=-=-=-=-=-=-=-=-=-=-=-=-=-=-= [x] Exit -


btscanner

btscanner is a utility used to gather as much information as possible from an unpaired Bluetooth device. It is specifically aimed at extracting information from unpaired devices, such as IEEE OUI numbers, and possible host identification. The below example shows how to use btscanner to scan for available Bluetooth devices.
Example Usage: btscanner

Enter ‘i’ to begin a scan for devices, and then ‘a’ to abort the scan once devices are found. Select the discovered device by pressing “Enter” to see more information about the target.
Read more

winAUTOPWN v2.7- Vulnerability Scanner


winAUTOPWN v2.7 Released - Vulnerability Testing on Windows


winAUTOPWN and bsdAUTOPWN are minimal Interactive Frameworks which act as a frontend for quick systems vulnerability exploitation. It takes inputs like IP address, Hostname, CMS Path, etc. and does a smart multi- threaded portscan for TCP ports 1 to 65535. Exploits capable of giving Remote Shells, which are released publicly over the Internet by active contributors and exploit writers are constantly added to winAUTOPWN/bsdAUTOPWN. A lot of these exploits are written in scripting languages like python, perl and php. Presence of these language interpreters is essential for successful exploitations using winAUTOPWN/bsdAUTOPWN.


Exploits written in languages like C, Delphi, ASM which can be compiled are pre-compiled and added along-with others. On successful exploitation winAUTOPWN/bsdAUTOPWN gives a remote shell and waits for the attacker to use the shell before trying other exploits. This way the attacker can count and check the number of exploits which actually worked on a Target System.


Download here


Read more here
Read more

ANGRY IP SCANNER


ANGRY IP NETWORK SCANNER


                     Angry IP Scanner OR IP Scan is an cross-platform network scanner designed to be fast ip scan and simple to use. It scans IP addresses and ports for a given IP range as well as has many other features.


The program uses separate threads for each scanned address to reduce scanning speed. It can also display NetBIOS information: computer name, workgroup, currently logged user and MAC address.
It runs on Linux, Windows, and Mac OS X, possibly supporting other platforms as well.

It is widely used by network administrators and just curious users around the world, including large and small enterprises, banks, and government agencies.


 Download here


Read more

DNS scan With Fierce


DNS Discovery With Fierce Domain Scan

This is just a quick post about some fun I had recently with Fierce Domain Scanner. I always find it amusing when I hear people say that they think naming a Server something other than www will afford them some protection. I always assume if it's out there then people know about it, no matter what you call it.

Using Fierce Domain Scanner from the Backtrack Distro I was able to point it at a domain and query DNS for available hosts. Using the command line below it turned up some interesting results:

perl fierce.pl -dns boots.com


When run, Fierce will contact my DNS server to get the targets name servers and then use them to first attempt to get the SOA records (which will likely fail these days) and then it will use the hosts.txt file to guess names. The reason it will switch to using the targets DNS is because it assumed that there is a chance that the internal DNS and the external DNS are on the 
same box, so here theres a chance of getting some internal names.

This scan uses the hosts.txt file in the same directory as the perl script to bruteforce DNS names and discover live hosts. The hosts.txt file can be updated manually or you can point Fierce to an alternative one.

Once a name is found it will scan up and down that range (5 address by default but this can be changed) looking for hosts with the same domain name. Now if this is a pentest and earlier reconnaissance has uncovered 
other associated domain that are in the scope of the test, Fierce can be told to look out for host with those domain names (use the -search option).

This tool is great to run against your own domain to see if there's anything there that shouldn't be.
Read more

Vulnerability Scanning With Nessus


Basic Vulnerability Scanning With Nessus


"Chennai Hackers connect" would like to preface this entry by stating that vulnerability scanning is not a penetration test. It is merely one part of a test and should be combined with other forms of activity to result in a thorough examination of all vulnerabilities, whether they be human, policy or technical.


About Nessus
Nessus is the worlds most popular open source vulnerability scanner. Nessus is available for Windows or Linux. The version we will be using throughout this blog entry will Nessus 3 running in Ubuntu. Nessus uses a Client Server model.

Nessus Server
The Nessus server is called nessusd. The server does not have to be on the same computer as the Nessus Client and communications between the server and client can be encrypted.


Nessus Client
The Nessus Client we will be using is called NessusClient. Below is a screenshot of the NessusClient interface.


Nessus consists of the following:

Plugins
plugins are checks for vulerabilities that Nessus performs. The plugins database can be updated using the following command.
/opt/nessus/sbin/nessus-update-plugins

Unless you have a paid subscription to Nessus you will only recieve plugins that are older than 7 days. Plugins can be written using the Nessus scripting language NASL. Update the plugins before starting the nessusd server.

Tasks
A task is created to hold duties. a task can be something such as Weekly Checks or Unauthorised Program Scan etc....

Scopes
Scopes represent connections to the Nessus Server (nessusd) are part of a task. Scopes contain lists of hosts (Targets) to scan and tasks can hold many scopes such as Web Servers, File Servers or VNC Hosts etc...

Targets
Targets are hosts or lists of hosts. These can be entered in as fully qualified domain names, IP addresses or IP ranges.


Getting Nessus Up and Running

Installation
1. Download and install Nessus 3. you will need the NessusClient package also. The packages are available at www.nessus.org
2. Once installed update the plugins using /opt/nessus/sbin/nessus-update-plugins

Setting Up
1. Start nessusd from /opt/nessus/sbin/nessusd
2. Start NessusClient from /usr/bin/NessusClient
3. Log into the Nessus Client with the account credentials created during the installation.


Using Nessus
In the example below We will perform a targeted audit of web Servers in my home lab.

We first used NMAP to find alive hosts using:

nmap -sL 192.168.1.1/24

This turned up 2 hosts (shown below).


we then use NMAP to determine if any of the 2 hosts found are listening on port 80 using:

nmap -sV -p80 192.168.1.10,20


In a pentest we would look for Web Servers on non-standard ports such as 8080 8008 or 81 also.

Now we have found a web server and from looking at the version we see it's IIS 6.0 we turn to Nessus.

After firing up Nessus we configure the following options.

1. Select Global Settings and click the connect icon. This will allow me to alter the global configuration and give me access to the plugins. These global settings can be changed and will form the default settings for new tasks.

2. We create a new Task called "Web Servers" and a scope called "IIS Servers"

3. Within the scope i set my target as 192.168.1.10

3. As in this example I'm only going to scan for IIS Vulnerabilities i set my filter for "IIS" on Name and Description and then select Enable All Plugins. This just enables the plugins related to IIS. details of plugins can be viewed by double clicking on a particular plugin.


4. After executing the Scan within Nessus Client, Nessus will perform a portscan of my target and then scan for vulnerabilities.

5. Following the scan i check out the report that Nessus produces and look for any vulnerabilities that may have been found.


The test above is a basic description of a vulnerability scan of a IIS web server to familierise you with Nessus. If you are serious about scanning for vulnerabities you will need to explore the Interface and adjust the various option for your scan

In another example rather than targeting a particular service i have opted to scan use all vulnerability checks (plugins). Although this is particularly noisy and has a better chance of finding a vulnerability it may crash services so use with caution.


This scan found a few vulnerabilities, one being a vulnerability in the server service that has not been patched (ms06-035). If i wanted to exploit this vulnerability the next step i would perform would be to find a working exploit for this platform. After a few minutes of searching i find an exploit at www.milw0rm.com/exploits/2057


Addition Options

When setting the options, either globally or for a particular scan, you can set the following:


  • Provide a username and password for the target.
  • Not to scan fragile devices (printers)
  • Global variables (CGI Scanning, network types, reports, logs, debugging)
  • Http login credentials
  • Login configurations (FTP, NNTP, HTTP, POP2, POP3, IMAP, SMB)
  • Nessus scanner options
  • Oracle settings
  • Ping options
  • Services (SSL options, number of connections, timouts)
  • SMB Enumeration options
  • SNMP options

Nessus Knowledge Base

by using the Nessus Knowledge Base Nessus will provide various options to remember previous findings from scans and utilise that information in future scans


Further Reading
Read more

vulnerability scanning using BACKTRACK 5


BackTrack 5: Using w3af to scan the web for vulns

 THIS IS FOR EDUCATIONAL PURPOSE ONLY !
If you using BackTrack then it'll be much easier for you cause in BT w3af is already installed so lets get started !


For BackTrack users
Go to Application > BackTrack > Exploitation > Web Exploitation tools => w3af gui . Click on w3af gui , a window will apear and there is your w3af.BackTrack 5: Using w3af to scan the web for vulns
For Windows
You have to install in manually if you using windows . You can download it fromHERE When download is completed extract it and you'll find the installation file there. Install it
Using w3af
Now its time to use w3af , its pretty easy. When you start w3af you'll see a window like :BackTrack 5: Using w3af to scan the web for vulnsThere is a Target text field , you have to enter the URL of the target website there . Below that there is a Plugin and Active tabs . After entering the URL of the website , you have to select the Scan type by selecting those plugins . More plugin you select , more will be the time to scan. Select the Scan type and press the play button above .
Getting the results
When the scan is running or finished , you'll see a window like :BackTrack 5: Using w3af to scan the web for vulnsCan you see the lower right corner , there are 3 pointers with some signs and with numbers 2 0 0 . Those are vulnerabilities no. . If you get numbers on 2nd pointer then you'll have a high rate of success.BackTrack 5: Using w3af to scan the web for vulnsNow go to Results . There you'll find the result of the scan . Above window is Exploits window , if you see anything on middle panel then the site is more vulnerable. Now when you have the vulnerabilities , you can exploit that according to your choice . 
Read more

NMAP COMPLETE TUTORIAL

NMAP TUTORIAL


Four Types of switches 
1.Synchronous Scans
2.Ping Scans
3.Time Scans
4.Output Type

Synchronous Scan:
All synchronous scans start with “-s”(without quotes), note that the ‘s’ denoting synchronous is not capital. Now a basic synchronous scan command is written as follows,

nmap -s[synchronous scan type] ip_address
---------------------------------------------------------
-sT Synchronous TCP scan
-sS Synchronous Stealth scan(This type of scan most of the time goes undetected by remote system)

-sF Synchronous FIN Scan(Sends FIN packets with RST flag)
-sX XMAS tree scan(A packet is known as XMAS when its all flag are set)
-sU UDP scan
-sN NULL Scan
-sP Ping Scan
-sO Protocol Scan
-sA ACK Scan
-sW Windows Scan
-sR Remote Procedure Call
-sL List DNS
-sI IDLE scan(A scan done with spoofed IP Address)

How to remember all synchronous scans: After reading above switch list you must have noted all types of scans appears to start with first letter capital of its own spelling placed next to “-s” except protocol scan which uses O. So practically you don’t need to remember anything other than which type of scan you want to perform then post fix “-s” with its capital letter. Isn’t that easy, now consider you want to scan aaa.bbb.ccc.ddd for its open ports and DNS entries. Note what you want,
-List DNS that means L

so this will be your command,
nmap aaa.bbb.ccc.ddd -sL

If you want to scan UDP protocol then type,
nmap aaa.bbb.ccc.ddd -sO UDP

Note: No two Synchronous Scans can be combined together.
nmap -sS -sU aaa.bbb.ccc.ddd is illegal.

Ping Scan: All Ping scans start with “-P”, note that P is capital and denotes ping. Now basic ping scan command is written as,

nmap -P[ping scan type] ip_address
-------------------------------------
-Pn No Ping
-PT TCP Ping
-PA ACK Ping
-PU UDP Ping
-PO Protocol Scan
-PS Synchronous Ping
-PI ICMP Ping Echo
-PB UDP ICMP timestamp
-PM ICMP Net Mask or Masked Scan

Now note the next option appearing after P is first letter capital of word’s own spelling except protocol ping and timestamp ping. As shown earlier everytime p from protocol will be replaced by O in scan type. To remember timestamp switch remember last letter p in timestamp appears like B.

Time Scans: Time switches are denoted by capital T.

-T Paranoid 300 seconds between scans
-T Sneaky 15 seconds between scans
-T Polite 4 seconds between scans
-T Normal Runs parallel scans
-T Aggressive 1.25 sec/probe
-T Insane 0.3 sec/probe

To remember time scans first we arrange times in descending order.
300 15 4 - 1.25 0.3

My friend is Paranoid who Sneaks around networks,
300 15
He appears Polite Normally but is Aggressive to the level of Insanity.
4 - 1.25 0.3

I think that will do. All time switches are appended at last of nmap command
nmap aaa.bbb.ccc -sS -T Polite

Output Type: It just formats output as you want. Always starts with “-o”

-oN Normal Output
-oX XML Output
-oG Grapple Output
-oA All Output

I don’t think now to explain how to remember them.

Other Important Switches:
--traceroute works similar as any other trace route program
-R Resolve DNS along with port scan
-v Scan in verbose mode
-O OS Scan
-----------------------------------------------------
So here’s an example to create scan:
1.Create a Stealth Synchronous scan with normal output with 15 seconds between each scan. Resolve DNS and use verbose mode?
Ans:
-Scan Type Synchronous means “-s”
-Subtype stealth “-sS”
-Use verbose “-sS -v”
-Resolve DNS “-sS -v -R”
-Normal Output “-sS -v -R -oN”
-15 seconds between scans “-sS -v -R -oN -T Sneaky”

So the answer is,
nmap aaa.bbb.ccc -sS -v -R -oN -T Sneaky

Following are for you try yourself,
2.Create a Ping protocol scan with 0.3 seconds scan difference between ports.
3.Create a Synchronous UDP scan with xml output use verbose mode.


Read more