
Vulnerability Scanning With Nessus
Basic Vulnerability Scanning With Nessus
"Chennai Hackers connect" would like to preface this entry by stating that vulnerability scanning is not a penetration test. It is merely one part of a test and should be combined with other forms of activity to result in a thorough examination of all vulnerabilities, whether they be human, policy or technical.
About Nessus
Nessus is the worlds most popular open source vulnerability scanner. Nessus is available for Windows or Linux. The version we will be using throughout this blog entry will Nessus 3 running in Ubuntu. Nessus uses a Client Server model.
Nessus Server
The Nessus server is called nessusd. The server does not have to be on the same computer as the Nessus Client and communications between the server and client can be encrypted.
Nessus Client
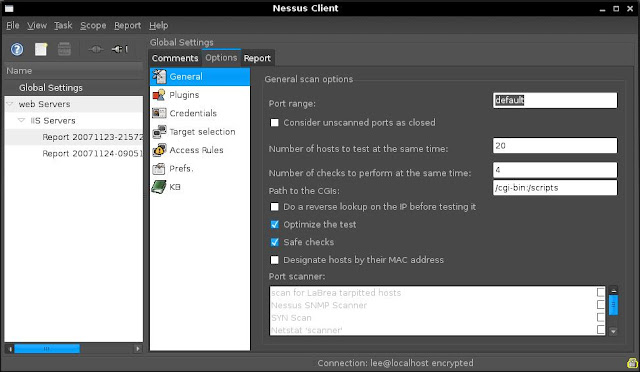
The Nessus Client we will be using is called NessusClient. Below is a screenshot of the NessusClient interface.
Nessus consists of the following:
Plugins
plugins are checks for vulerabilities that Nessus performs. The plugins database can be updated using the following command.
/opt/nessus/sbin/nessus-update-plugins
Unless you have a paid subscription to Nessus you will only recieve plugins that are older than 7 days. Plugins can be written using the Nessus scripting language NASL. Update the plugins before starting the nessusd server.
Tasks
A task is created to hold duties. a task can be something such as Weekly Checks or Unauthorised Program Scan etc....
Scopes
Scopes represent connections to the Nessus Server (nessusd) are part of a task. Scopes contain lists of hosts (Targets) to scan and tasks can hold many scopes such as Web Servers, File Servers or VNC Hosts etc...
Targets
Targets are hosts or lists of hosts. These can be entered in as fully qualified domain names, IP addresses or IP ranges.
Getting Nessus Up and Running
Installation
1. Download and install Nessus 3. you will need the NessusClient package also. The packages are available at www.nessus.org
2. Once installed update the plugins using /opt/nessus/sbin/nessus-update-plugins
Setting Up
1. Start nessusd from /opt/nessus/sbin/nessusd
2. Start NessusClient from /usr/bin/NessusClient
3. Log into the Nessus Client with the account credentials created during the installation.
Using Nessus
In the example below We will perform a targeted audit of web Servers in my home lab.
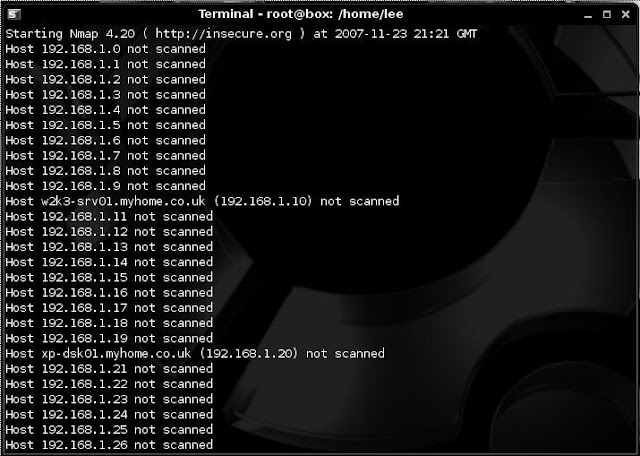
We first used NMAP to find alive hosts using:
nmap -sL 192.168.1.1/24
This turned up 2 hosts (shown below).
we then use NMAP to determine if any of the 2 hosts found are listening on port 80 using:
nmap -sV -p80 192.168.1.10,20

In a pentest we would look for Web Servers on non-standard ports such as 8080 8008 or 81 also.
Now we have found a web server and from looking at the version we see it's IIS 6.0 we turn to Nessus.
After firing up Nessus we configure the following options.
1. Select Global Settings and click the connect icon. This will allow me to alter the global configuration and give me access to the plugins. These global settings can be changed and will form the default settings for new tasks.
2. We create a new Task called "Web Servers" and a scope called "IIS Servers"
3. Within the scope i set my target as 192.168.1.10
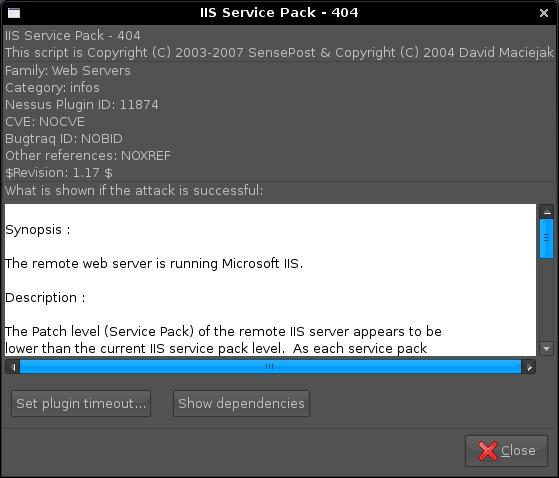
3. As in this example I'm only going to scan for IIS Vulnerabilities i set my filter for "IIS" on Name and Description and then select Enable All Plugins. This just enables the plugins related to IIS. details of plugins can be viewed by double clicking on a particular plugin.
4. After executing the Scan within Nessus Client, Nessus will perform a portscan of my target and then scan for vulnerabilities.
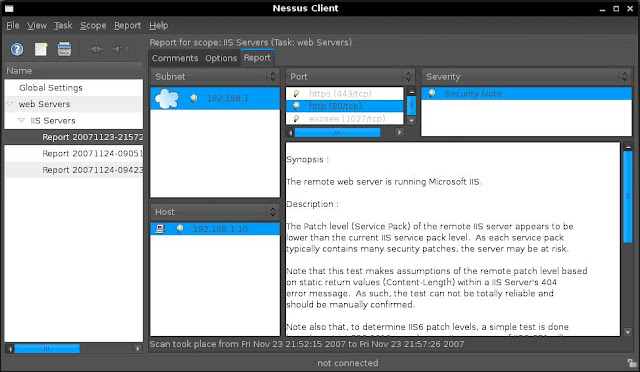
5. Following the scan i check out the report that Nessus produces and look for any vulnerabilities that may have been found.
The test above is a basic description of a vulnerability scan of a IIS web server to familierise you with Nessus. If you are serious about scanning for vulnerabities you will need to explore the Interface and adjust the various option for your scan
In another example rather than targeting a particular service i have opted to scan use all vulnerability checks (plugins). Although this is particularly noisy and has a better chance of finding a vulnerability it may crash services so use with caution.
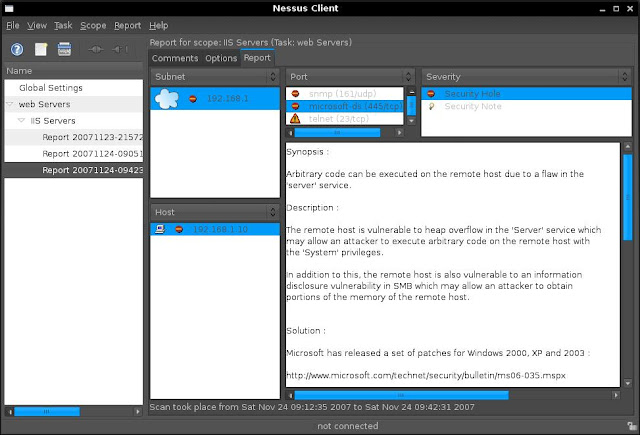
This scan found a few vulnerabilities, one being a vulnerability in the server service that has not been patched (ms06-035). If i wanted to exploit this vulnerability the next step i would perform would be to find a working exploit for this platform. After a few minutes of searching i find an exploit at www.milw0rm.com/exploits/2057
Addition Options
When setting the options, either globally or for a particular scan, you can set the following:
Nessus Knowledge Base
by using the Nessus Knowledge Base Nessus will provide various options to remember previous findings from scans and utilise that information in future scans
Further Reading
About Nessus
Nessus is the worlds most popular open source vulnerability scanner. Nessus is available for Windows or Linux. The version we will be using throughout this blog entry will Nessus 3 running in Ubuntu. Nessus uses a Client Server model.
Nessus Server
The Nessus server is called nessusd. The server does not have to be on the same computer as the Nessus Client and communications between the server and client can be encrypted.
Nessus Client
The Nessus Client we will be using is called NessusClient. Below is a screenshot of the NessusClient interface.

Nessus consists of the following:
Plugins
plugins are checks for vulerabilities that Nessus performs. The plugins database can be updated using the following command.
/opt/nessus/sbin/nessus-update-plugins
Unless you have a paid subscription to Nessus you will only recieve plugins that are older than 7 days. Plugins can be written using the Nessus scripting language NASL. Update the plugins before starting the nessusd server.
Tasks
A task is created to hold duties. a task can be something such as Weekly Checks or Unauthorised Program Scan etc....
Scopes
Scopes represent connections to the Nessus Server (nessusd) are part of a task. Scopes contain lists of hosts (Targets) to scan and tasks can hold many scopes such as Web Servers, File Servers or VNC Hosts etc...
Targets
Targets are hosts or lists of hosts. These can be entered in as fully qualified domain names, IP addresses or IP ranges.
Getting Nessus Up and Running
Installation
1. Download and install Nessus 3. you will need the NessusClient package also. The packages are available at www.nessus.org
2. Once installed update the plugins using /opt/nessus/sbin/nessus-update-plugins
Setting Up
1. Start nessusd from /opt/nessus/sbin/nessusd
2. Start NessusClient from /usr/bin/NessusClient
3. Log into the Nessus Client with the account credentials created during the installation.
Using Nessus
In the example below We will perform a targeted audit of web Servers in my home lab.
We first used NMAP to find alive hosts using:
nmap -sL 192.168.1.1/24
This turned up 2 hosts (shown below).

we then use NMAP to determine if any of the 2 hosts found are listening on port 80 using:
nmap -sV -p80 192.168.1.10,20

In a pentest we would look for Web Servers on non-standard ports such as 8080 8008 or 81 also.
Now we have found a web server and from looking at the version we see it's IIS 6.0 we turn to Nessus.
After firing up Nessus we configure the following options.
1. Select Global Settings and click the connect icon. This will allow me to alter the global configuration and give me access to the plugins. These global settings can be changed and will form the default settings for new tasks.
2. We create a new Task called "Web Servers" and a scope called "IIS Servers"
3. Within the scope i set my target as 192.168.1.10
3. As in this example I'm only going to scan for IIS Vulnerabilities i set my filter for "IIS" on Name and Description and then select Enable All Plugins. This just enables the plugins related to IIS. details of plugins can be viewed by double clicking on a particular plugin.

4. After executing the Scan within Nessus Client, Nessus will perform a portscan of my target and then scan for vulnerabilities.
5. Following the scan i check out the report that Nessus produces and look for any vulnerabilities that may have been found.

The test above is a basic description of a vulnerability scan of a IIS web server to familierise you with Nessus. If you are serious about scanning for vulnerabities you will need to explore the Interface and adjust the various option for your scan
In another example rather than targeting a particular service i have opted to scan use all vulnerability checks (plugins). Although this is particularly noisy and has a better chance of finding a vulnerability it may crash services so use with caution.

This scan found a few vulnerabilities, one being a vulnerability in the server service that has not been patched (ms06-035). If i wanted to exploit this vulnerability the next step i would perform would be to find a working exploit for this platform. After a few minutes of searching i find an exploit at www.milw0rm.com/exploits/2057
Addition Options
When setting the options, either globally or for a particular scan, you can set the following:
- Provide a username and password for the target.
- Not to scan fragile devices (printers)
- Global variables (CGI Scanning, network types, reports, logs, debugging)
- Http login credentials
- Login configurations (FTP, NNTP, HTTP, POP2, POP3, IMAP, SMB)
- Nessus scanner options
- Oracle settings
- Ping options
- Services (SSL options, number of connections, timouts)
- SMB Enumeration options
- SNMP options
Nessus Knowledge Base
by using the Nessus Knowledge Base Nessus will provide various options to remember previous findings from scans and utilise that information in future scans
Further Reading
Written by Admin
Chennai hackers connect is a branch of Computer maniac.It is the platform for the HACKERS to connect and start exploiting.

0 comments: